- Acknowledgements
- Introduction
- Chapter 1: Measurement Tools, Layout & Job Planning
- Chapter 2: Basic Hand Tools
- Chapter 3: Filing & Sawing
- Chapter 4: Grinding, Reaming, Broaching & Lapping
- Chapter 5: Drills & Drilling Operations
- Chapter 6: Threads & Threading
- Chapter 7: Turning Operations
- Chapter 8: Milling Operations
- Chapter 9: Fastening Methods
- Chapter 10: Why Steel Hardens
- Chapter 11: Safety & Good Shop Practices
- Chapter 12: Other Shop Know-how
- Appendix I: Sharpening Steel Lathe Tools
- Appendix II: Surface Speed Table & Cutting Tool Selector Chart
- Appendix III: Decimal Equivalents of Fractional, Letter & Metric Drills
- Glossary
- Index
Chapter 12
Other Shop Know-how
Depend on the rabbit’s foot if you will, but remember it didn’t work for the rabbit.
—Laurence J. Peter
Introduction
The title of Master Machinist is earned only after years of training and even more years of experience. This chapter presents a collection of expert advice and practical know-how from these seasoned veterans. Some of their solutions are simple and straightforward, while others are down right ingenious. Their direct answers to common questions are of benefit in two ways. First, they show how others have approached specific machine shop problems, and second, they lead the way to find your own solutions.
Section I – Turning-related Methods
Friction Driving on the Lathe
You require one or more metal, rubber or plastic discs with a diameter tolerance of ±0.001 inches. The workpiece material is supplied flat and must remain flat after cutting. How can this part be made?
- Cut two metal back-up cylinders the same diameter as needed for the finished discs.
- Center drill one of the cylinders.
- Set up the work in the lathe as in Figure 12–1. Using the tailstock and live center, compress the slightly oversized workpieces between the metal back-up cylinders. This is called friction driving. When cutting more than one disc, use double-stick tape between the parts to keep them in place.
- Reduce the diameter of the workpieces so they are slightly larger than the back-up cylinders, then set the lathe tool bit so it just clears the right-hand cylinder, and “wipe” away the excess workpiece material. Take light cuts.
This method works well whether the workpiece material is just a few thousandths of an inch thick to ¼-inch thick. It does not distort thin stock, works well with foil, and many identical discs can be cut at once. Rubber can also be trimmed, but be sure to allow for changes in part diameter caused by compression. This method does the work of an expensive punch and die set.
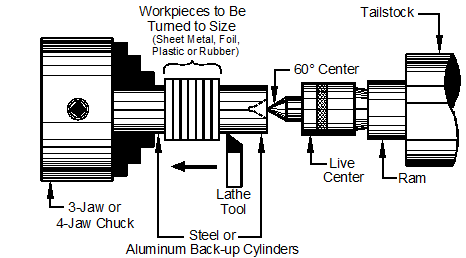
Figure 12–1. Cutting multiple discs to exact diameter using fiction driving.
A workpiece, which may not be drilled for a mandrel and is too oversized to fit into the largest available chuck, must be turned. How can this be done?
Set up the work as shown in Figure 12–2. Apply enough axial force with the tailstock through the live center to keep the workpiece in place. The chuck jaws may be adjusted to minimize dishing of the work from these forces.
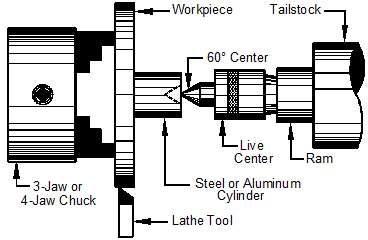
Figure 12–2. Turning oversized work.
A back-up cylinder may also be used as in Figure 12–3, but with the addition of abrasive cloth rubber-cemented to the cylinder face to increase friction. This prevents slippage and eliminates all dishing.

Figure 12–3. Turning oversized work with a large back-up cylinder to prevent dishing.
Grinding Accurate Radii on Lathe Tools
How can a specific radius be applied to HSS lathe tools?
Here are the steps:
- Chuck a cylindrical aluminum oxide grinding stone in a drill press. This stone must have a radius equal to or larger than the desired lathe tool radius.
- Mount a diamond wheel-dressing tool in a magnetic holder, and place the holder so the dressing tool can reduce the grinding stone to the desired radius. See Figure 12–4 (right).
- Use the corner of a bench grinding wheel to rough out a U- or V-shape on the end of the HSS cutter as in Figure 12–4 (left).
- Clamp a piece of steel or wood to the drill press table as a fence. This will guide the HSS cutter into the cylindrical stone to apply the desired radius, Figure 12–5 (left).
- Apply a relief angle to the tool 0.030 to 0.050 inch below the cutter face. Either tilt the drill press table or use a wedge-shaped fixture to apply the relief, Figure 12–5 (right).
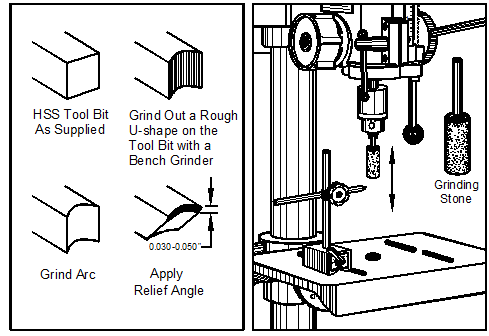
Figure 12–4. Steps to cut a lathe tool bit with a radius (left) and trimming the grinding stone to size with a diamond wheel dresser (right).
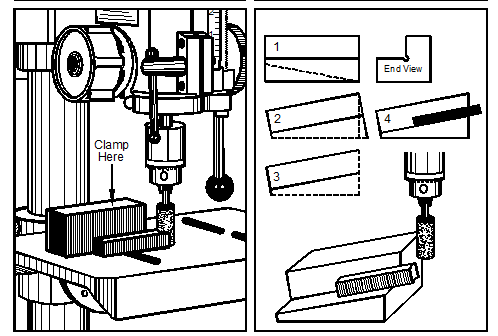
Figure 12–5. Grinding a radius on a lathe cutter (left)and applying the relief angle (right).