
- Preface
- Acknowledgements
- Chapter 1: Welding Overview
- Chapter 2: Safety
- Chapter 3: Terms, Joints, & Edge Preparation
- Chapter 4: Tools & Welding Tables
- Chapter 5: Shielded Metal Arc Welding
- Chapter 6: Wire Feed Welding
- Chapter 7: Gas Tungsten Arc Welding
- Chapter 8: Oxyacetylene
- Chapter 9: Controlling Distortion
- Chapter 10: Cutting Processes
- Chapter 11: Brazing & Soldering
- Chapter 12: Common Problems & Solutions
- Chapter 13: Design Tips
- Chapter 14: Fabrication & Repair Tips
- Chapter 15: Tools & Tooling
- Chapter 16: Pipe & Tubing
- Chapter 17: Metallurgy
- Chapter 18: Power Supplies & Electrical Safety
- Chapter 19: Bending & Straightening
- Index
- Credits
Chapter 6
Wire Feed Welding – Gas Metal, Flux Cored &Metal Cored Arc Welding
Genius is the ability to reduce the complicated to the simple.
C.W. Cram
Introduction
All wire feed processes use a continuous electrode fed into the welding pool. The weld pool is protected from the atmosphere by shielding gas which is either supplied from a cylinder or produced by the welding electrode itself.
Today these processes consume over 70% of the total filler materials used and this percentage continues to increase. These wire-feed welding processes use the same power supplies and electrode wire handling equipment, but they all have different weld bead properties. Although they apply the same type of welds as the older SMAW process, the higher productivity of wire feed equipment easily makes up for the higher cost. Wire feed processes are popular because they are easy to learn and readily adapted to robotic welding.
Section I – Process Basics
Equipment
- Constant-voltage DC welding power supply with a current capacity from 90–850 A and from 13–45 V. The smallest wire feed welders run on 20 A 110 VAC house outlets, but the larger units require three-phase power.
- Wire feed mechanism, which contains an electrode wire spool support, feed motor, wire-feed drive rolls and the associated electronics. This mechanism may be housed in the same cabinet as the welding power supply or in a separate unit. In general, the higher the current capacity of the power supply—the heavier wire it can run and the greater the weight of the unit—the more likely it will require two units: a power supply and a wire feeder. The welding power supply and the wire feeder are interconnected electrically.
- Welding cable, which runs from the wire feeder to the welding gun, contains:
- Heavy copper conductor that brings the welding current to the torch.
- Control circuit wires for the gun’s trigger switch.
- Hose for shielding gas, if used.
- High-current guns have two hoses for cooling water in and out.
Hoses and conductors inside the welding cable make the cable stiff and relatively inflexible. Cables are about 3/4" diameter for the smallest torches and upwards of one inch on large torches. Cables are offered in 8, 10, 12, 15, 20 and 25 foot lengths. The longer the cable and the thinner the electrode wire, the more difficult it is to push the electrode wire through the cable. This limits the maximum practical length of a cable to 25 feet.
- Welding gun – Figure 6-1 shows an air-cooled GMAW gun with provisions for shielding gas. This gun can also be used without shielding gas for self-shielded flux core arc welding. Removing the shielding gas nozzle provides better weld pool visibility and the ability to easily enter smaller joints than with the nozzle attached. Although this gun can be used without the shielding gas nozzle, any contact with the workpiece will weld the contact tube to the work. For this reason a small insulated extension guide is usually placed over the contact tube.
Because very high welding currents are used—they can exceed 250 amperes—many FCAW guns have a sheet metal heat shield to protect the operator’s hands from the intense arc heat. See the gun in Figure 6-2 with its heat shield installed. Most welding guns are air-cooled, but some FCAW water-cooled guns operate on the 100% duty cycle needed for robotic welders.
- Grounding clamp, work lead cable and terminals.
- The gas-shielded processes—GMAW, FCAW-GS and MCAW—also require hoses, a pressure regulator, pressure gauges or a flowmeter, a compressed gas cylinder, and shielding gas.
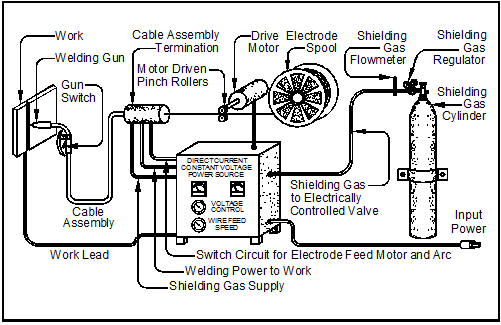
Figure 6-3 shows how components of a wire-feed outfit hook together.
Air-cooled GMAW gun. Because this gun can provide shielding gas, it also supports FCAW-GS and MCAW. It is easily converted to FCAW by changing the electrode wire, turning off the
shielding gas, and usually, changing the power supply polarity.
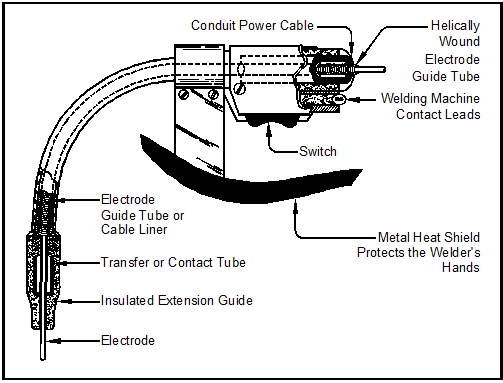
Figure 6-2. An FCAW-SS gun with metal heat shield has no provision for shielding gas.
for GMAW, FCAW-GS and MCAW. FCAW-SS uses the same setup except it requires no provisions for shielding gas.
Additional equipment is sometimes attached to GMAW equipment. These additions include:
- Water cooler – Welding guns operated continuously at high amperage levels get so hot that the gun literally burns up from both the heat of the weld and the heat from the contact tip. Feeding cooling water into the gun keeps its temperature down. The water, after it is heated by the tip, is then recirculated back to the water cooler. The water cooler consists of a pump, a fan, and an internal spray, much like an evaporative cooler.
- Smoke evacuator – Some guns have built-in systems at the nozzle of the welding gun for capturing and removing welding smoke. There are also free-standing smoke evacuators. Reducing the level of smoke increases welder safety, comfort and visibility, but on the down side, the incorporation of smoke evacuators in the welding gun increases the gun’s weight and contributes to welder fatigue.
Transfer Tube
All torch designs supply current to the gun through a braided copper conductor located inside the welding cable. At the end of this braided cable, welding current transfers to the electrode wire through the copper transfer tube. The transfer tube is subject to wear and is a consumable. Refer to the transfer tubes in Figures 6-1 and 6-2.
Both the gas nozzle of the GMAW gun and the extension guide on the FCAW gun are electrically insulated from the transfer tube to prevent them from becoming welded to the workpiece.
Welding Process
The welder starts by positioning the electrode wire where the weld bead is to begin, actually touching the welding wire to the work metal. When the welder drops his hood and squeezes the welding gun trigger, six events happen simultaneously:
- The DC constant-voltage welding power supply turns on, supplying power to the welding gun.
- The wire feed mechanism pulls electrode wire from the spool and pushes it through the electrode cable liner and out the transfer tube.
- For GMAW, a solenoid—an electrically operated valve—opens and releases shielding gas from the regulator and flowmeter. This gas surrounds the electrode and the weld pool, shielding them from the atmosphere.
- Then, the electrode wire between the contact and the base metal is heated and deposited into the weld. As the wire is consumed, the feed mechanism supplies more electrode wire at the proper rate to maintain a stable arc.
- The welder manipulates the gun to deposit the weld metal in the desired pattern. When the weld is completed, the welder releases the trigger shutting off the welding current, wire feed and shielding gas.
- Control electronics continues the shielding-gas flow for a second or two after the arc is extinguished to protect the weld metal by keeping air away—particularly oxygen and nitrogen—until the weld metal cools.
Wire Feed Welding Setup Procedure
- Make sure the welder and wire feeder power is turned off.
- Mount the electrode wire spool on the wire feeder.
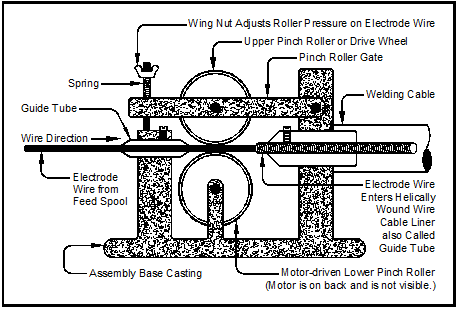
- Without letting go of the wire—it will uncoil and make a snarl if you do—use a file to remove burrs from the end of the electrode wire to prevent damage to the cable liner and transfer tube. Then, open the pinch, or feed roller gate, and insert the electrode wire into the feed-roller mechanism and the liner tube. Close the gate, securing the wire. Make sure the wire drive wheels match the wire diameter and wire type. Smooth-groove rollers are used for solid wire and serrated rollers are used for flux-cored or metal-cored wire. See Figure 6-4.
- Turn on the power for the wire-feed motor, then use the jog or inch button to load the wire into the welding cable liner and up to and through the welding gun.
- Use the jog or inch button on the wire feeder or power supply to actuate the electrode-wire drive motor, then adjust the feed roller pressure until the wire feeding into the rollers can no longer be stopped by pinching the electrode wire between your thumb and index finger. Erratic wire feeding usually results from too much roller pressure, which causes the electrode wire to flatten—and loose feed—as it passes through the rollers.
- Properly secure the compressed shielding gas cylinder and crack the valve to remove any dirt. Then, put the regulator—usually containing a flowmeter as well—on the cylinder valve and secure the other end of the gas line into the welding machine.
- Turn the welding power supply to on and hold the purge button down for 5 seconds to flush air from the gas lines and fill them with shielding gas. If there is no purge button on the welding machine, then, making sure the gun is not touching anything or anybody, open the pinch roller gate and squeeze the welding gun trigger for 5 seconds. While performing this purge, set the flowmeter or pressure regulator for the recommended purge gas-flow rate: 20 ft3/hour for 0.032" wire would be a good starting point. On larger diameter electrode wire, begin with 20 ft3/hour on horizontal and 30–35 ft3/hour on out-of-position welds.
- Set the polarity to DCEN for GMAW and DCRP for most FCAW processes. Set the voltage and wire-feed speed. Get this information from the manufacturer’s data sheets for the electrode wire or from tables attached to the welding machine. Always make a test weld on scrap first to check your settings.
- Attach the work lead to a clean area on the work.
- Use wire cutters to trim the electrode stickout to the proper length—about 1/2 inch.
- Make sure the welding area is dry and free of flammable materials as well as volatile fumes, and that other personnel are protected from arc radiation and sparks.
- Put on your leather gloves and helmet, position the electrode against the work, squeeze the trigger, and begin welding.
Tip: Keep a wire cutter handy to remove the melted metal ball from the end of the electrode after completing one bead and before starting another.