- Title Page
- Copyright Page
- Contents
- Preface
- Acknowledgements
- Chapter 1: Setting Up Shop
- Chapter 2: Metals, Alloys, Oils & Hardness Testing
- Chapter 3: Tapers, Dowel Pins, Fasteners & Key Concepts
- Chapter 4: Filing & Grinding
- Chapter 5: Drilling, Reaming & Tapping
- Chapter 6: Bandsaws
- Chapter 7: Lathes
- Chapter 8: Milling Machines
- Chapter 9: Machine Shop Know How
- Index
- Credits
Chapter 6
Bandsaws
Nine tenths of education is encouragement.
—Anatole France
Section I – Vertical Bandsaws
Introduction
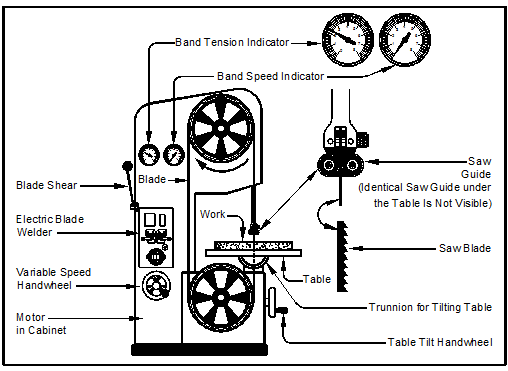
The vertical metal-cutting bandsaw or contour saw, shown in Figure 6-1, is the most common bandsaw design. Although this saw can perform cutoff operations on raw metal stock, its real value is in removing large amounts of metal quickly.

Figure 6-1. An industrial-grade vertical bandsaw.
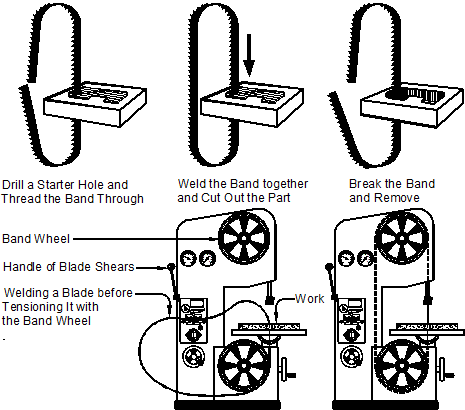
Vertical bandsaws have a continuous, endless blade called a band, which is tensioned on two or three wheels. Bands are made by electrically welding or silver brazing a strip of steel-toothed blade material end-to-end. The most common blade is 0.035-inches thick and can be broken and rejoined to cut out internal sections of a workpiece as in Figure 6-2. A typical industrial-grade bandsaw has an integral electric band welder to do the rejoining. Although a new bandsaw blade has one splice, older used blades often have several splices from being broken and rejoined for multiple interior cuts.

Figure 6-2. Cutting out an internal section in a workpiece (top).
When cutting out an internal section, the band passes through the work, the saw
table and around the lower band wheel during the splicing operation (bottom).
Functions
There are three different types of cutting that vertical bandsaws can perform:
- Cutting out parts from raw stock, also called band machining.
- Removing excess workpiece material before performing other, more precise machining operations. This eliminates the need to spend machining time and energy turning large sections of unwanted metal into chips. Often the excess material can be used on other jobs.
- Severing raw stock to length so it can be machined. Although a vertical bandsaw can perform this task, a horizontal bandsaw permits long pieces of stock—some up to 20 feet—to be held and handled more easily.
Bandsaw Operations
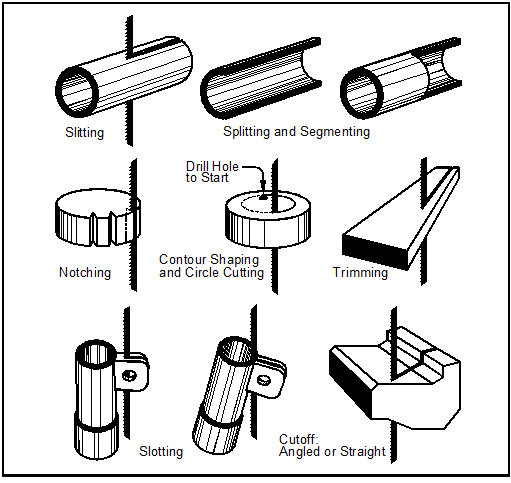
Figure 6-3 shows some of the different types of cuts bandsaws can make. On many parts, where dimensions are less critical, bandsaws can do nearly all the machining required. On parts with tighter dimensional tolerances, bandsaws can be used for slitting, and the rest of the machining done on mills or lathes.
Slitting is often done on the bandsaw instead of using a slitting saw because of the bandsaw’s greater speed and lower cost. Also, bandsaw blades cost less to remove the same volume of metal as slitting saws, which have relatively short lives and are not easily resharpened. In addition, bandsaw blades last longer because they distribute wear over many more teeth than a slitting saw.

Figure 6-3. Typical bandsaw operations.
Contour Bandsawing Procedure
Here are the steps to use a vertical bandsaw:
- Check the workpiece material to make sure it is smooth on its bottom so when the cut is made it is square with the work. Stone, grind or file away any projections.
- Lay out the part shape using layout fluid and a scriber. Then prick punch on top of the scribe lines to insure the cutting lines remain visible.
- If the part is complex, plan a sequence of cuts which allows the most secure part holding.
- Select the saw blade to match the work, taking into consideration:
- Tooth pattern – See page 193.
- Width – See pages 192 and 193.
- Gage or blade thickness – See pages 192 and 193.
- Tooth set – See page 194.
- Rake angle – See pages 194 and 195.
- Blade material – See page 195.
- Pitch or teeth per inch (TPI) – See pages 195 and 196.
- Mount the proper saw blade and guides on the machine.
- If an interior section of the part is to be removed, drill an access hole for the band in the part, thread the saw blade through the hole, and then splice together the blade ends.
- Set the blade speed for the workpiece material. Many bandsaws have recommended blade speeds for common materials listed on or inside their covers. Machinery’s Handbook also lists this data for virtually all materials you are likely to cut.
- Place the work on the saw table and position the upper saw guide to clear the work by ¼-inch.
- Secure the work against a piece of wood or in a work holder.
- Turn on the lubrication system, mister or compressed air, if present.
- Turn on the saw.
- Gradually bring the work up to the saw blade and, following the layout lines, begin the cut.

