
- Title Page
- Copyright Page
- Contents
- Preface
- Acknowledgements
- Chapter 1: Setting Up Shop
- Chapter 2: Metals, Alloys, Oils & Hardness Testing
- Chapter 3: Tapers, Dowel Pins, Fasteners & Key Concepts
- Chapter 4: Filing & Grinding
- Chapter 5: Drilling, Reaming & Tapping
- Chapter 6: Bandsaws
- Chapter 7: Lathes
- Chapter 8: Milling Machines
- Chapter 9: Machine Shop Know How
- Index
- Credits
Chapter 1
Setting Up Shop
We cannot solve problems by using the same kind of thinking we used when we created them.
—Albert Einstein
Introduction
Setting up a good working shop does not happen overnight. Gathering the right tools, adapting them to fit your needs and properly storing them comes gradually. Whether you are an experienced machinist or just starting out, this chapter will help speed the process. Many machinists underestimate the value of neat, well organized storage, but the old adage, “If you can’t find it, you don’t own it,” could not be more true than in the machine shop.
Section I – A Place for Everything
Workbenches
The workbench is the most basic piece of equipment in the shop. Figure 1-1 shows a workbench that really works. Besides a rigid surface, this design has lots of handy storage. There are many other excellent workbench designs, but they all have the following features in common:
- Rigidity – When hacksawing, filing or tugging on a wrench in the vise, the bench must not wiggle. Also, it must be solid enough for center punching and hammering. A rigid bench usually has bolted or welded joints and robust legs of 434-inch lumber or 4-inch steel pipe. There are also commercially available steel legs which simplify building a good sturdy bench. Bolting the bench to a wall adds rigidity and is a good idea in earthquake zones.
- Storage drawers with trays – Two or three 6-inch deep wood or steel drawers placed under the bench are handy for holding frequently used tools. Sliding shallow trays inside the drawers make small tools easy to find among the larger ones. Ball-bearing drawer slides are inexpensive, simple to install, and can handle heavy loads. See Figure 1-2.
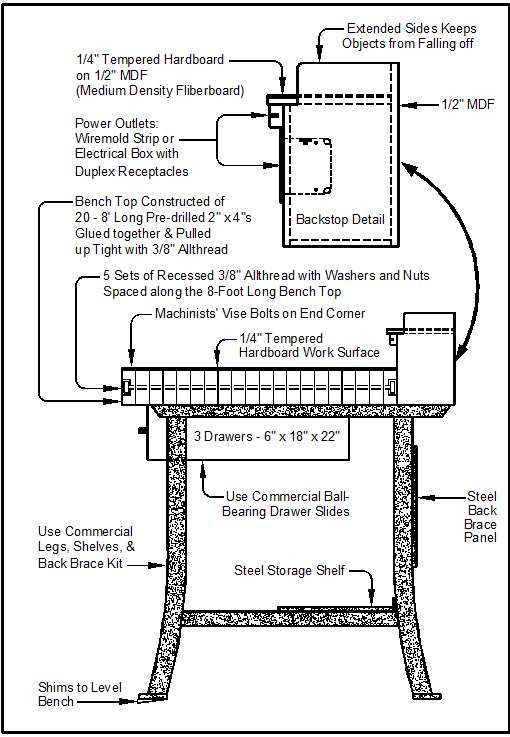
Figure 1-1. Plans for a machine shop workbench.
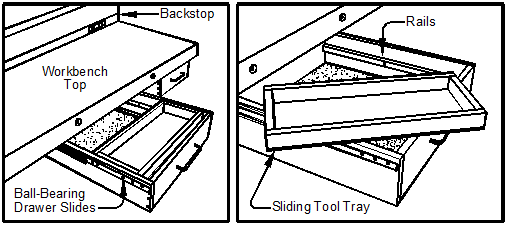
Figure 1-2. Ball-bearing slides make heavily loaded drawers easy to open.
Sliding trays in the drawers make smaller tools easy to find.
- Backstop with shelf – The backstop not only prevents small items from falling off the back of the bench, it provides a mount for power receptacles and supports a separate shelf above the workbench surface. On this shelf delicate tools and supplies that could be lost or damaged on the bench are kept handy and safe. Many machinists make this shelf deep enough to hold their Kennedy or Gerstner tool chests. Putting a machinists’ chest on a backstop shelf instead of directly on the workbench avoids having to clear the workbench in front of the chest every time the chest drawers must be opened.
- Smooth, hard work surface – Tempered hardboard, formerly called Masonite®, is ideal for most workbench surfaces. It is inexpensive and easy to replace when damaged or oil-stained. Plywood is a poor choice because it splinters, but it is fine as a base underneath the Masonite.
- Lower storage shelf – A shelf below the bench provides ready access to tools and materials and adds weight to the bench, improving its stability.
- Cross bracing – Angle iron, steel straps, steel panels or plywood sheets fastened between the back bench legs adds rigidity to the bench.
- Electrical outlets – Individual duplex outlets can be installed inside the backstop or pre-wired power strips can be secured to the backstop. To reduce the chances of electrical shock, mount the outlets a few inches above the bench surface so items on the bench do not poke into the power receptacles.
- Bench top height – Workbench heights vary according to the height of the user. Spacers can be placed under bench legs to raise them, or legs can be shortened to fit the user. The optimum height is usually determined by the vise jaws, which should be at the height of the user’s elbow to make filing and hacksawing more comfortable. Workbench top height for average individuals runs 28–32 inches, but to avoid stooping, taller people need higher benches.
- Rounded corners – Wherever possible, workbenches, worktables and workcarts should have rounded corners because curved corners hurt less when you bump into them. A 5-inch corner radius works well.
- Shims – If needed, use shims to level the workbench.
Vises
Vises and workbenches go together. After the workbench, the vise is the second most essential tool in the shop. When selecting a vise, here are some things to look for:
- Jaws that are a minimum of 4 inches wide and open to at least that same width. Also, using shop-made soft jaws of lead, aluminum, copper or leather prevent the jaws from marring workpieces.
- Replaceable jaws which fit against a step in the vise casting. This step adds strength to the vise by absorbing vertical hammering forces. See Figure 1-3.
- Vise screw threads should be concealed within the vise to protect them from damage by chips and other shop debris.
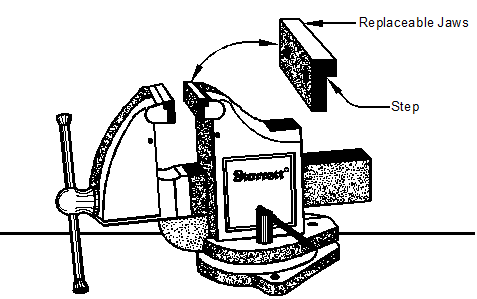
Figure 1-3. A quality machinists’ bench vise. Steps in the back of each vise jaw
absorb vertical hammering forces instead of the jaw screws which could shear off.