
- Preface
- Acknowledgements
- Chapter 1: Welding Overview
- Chapter 2: Safety
- Chapter 3: Terms, Joints, & Edge Preparation
- Chapter 4: Tools & Welding Tables
- Chapter 5: Shielded Metal Arc Welding
- Chapter 6: Wire Feed Welding
- Chapter 7: Gas Tungsten Arc Welding
- Chapter 8: Oxyacetylene
- Chapter 9: Controlling Distortion
- Chapter 10: Cutting Processes
- Chapter 11: Brazing & Soldering
- Chapter 12: Common Problems & Solutions
- Chapter 13: Design Tips
- Chapter 14: Fabrication & Repair Tips
- Chapter 15: Tools & Tooling
- Chapter 16: Pipe & Tubing
- Chapter 17: Metallurgy
- Chapter 18: Power Supplies & Electrical Safety
- Chapter 19: Bending & Straightening
- Index
- Credits
Chapter 15
Tools & Tooling
The more I want to get something done, the less I call it work.
—Richard Bach
Section I – Shop-Made Tools
Subtle Workpiece Marking
Because the same part may be worked on by several different welders or even several different shops, many welders inconspicuously mark the section of the part they repaired. This avoids the question of who made the repairs. To do this, marking punches can be made from drive pin punches of 1/8" diameter or less which are modified to produce a distinctive mark. A welder usually only reveals his marking code when a customer suggests that his work was done by someone else. See Figure 15-1.
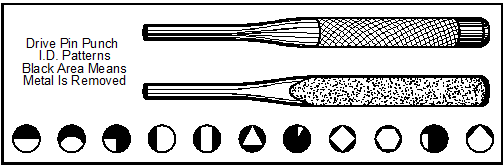
Figure 15-1. Small unobtrusive punch marks identify a welder’s or machinist’s work.
Fire Pot
Figure 15-2 shows a shop-made fire pot fabricated from two sections of steel pipe, a steel angle bracket, and a nut and bolt. The concentrated flame from this pot can be used to heat lead or to bring work up to red heat for bending. The tip of an oxyacetylene torch is positioned in the small pipe on the side of the fire pot to get optimum flame swirls around the inside of the pot. The torch tip is locked into place by the nut and bolt on the side of the small piece of tubing. The firepot has no bottom, it rests on a firebrick.
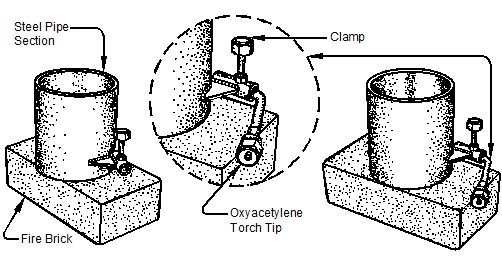
Figure 15-2. Shop-made steel fire pot on a fire brick.
Air Wrench Tools
The majority of electric- or air-driven drills turn too fast for larger drills or countersinks, but the shop-made air-wrench tool in Figure 15-3 solves that problem. To make this tool, use a little GTAW welding to join a countersink or a drill chuck to a cut-down impact socket. This method uses the high-strength and shock-resistant steel of the socket and its square drive to fit onto the air wrench. The advantage of the air wrench is that it has lots of torque and a slow speed, ideal for larger drills and countersinks.
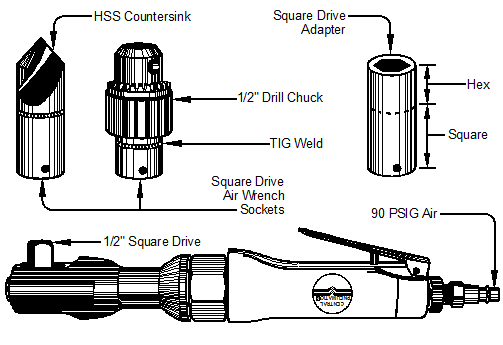
Figure 15-3. GTAW joins a square drive socket to
a countersink and a drill chuck for use in an air-wrench.
Single-Lip Carbide Milling Machine Cutters
Figure 15-4 (bottom) shows the welding fixture used to make the single-lip milling cutters shown in Figure 15-4 (top). The advantage of these cutters is that they are inexpensive, are easily sharpened many times on a green grinding wheel, and will cut steel up to Rc 60 with ease.
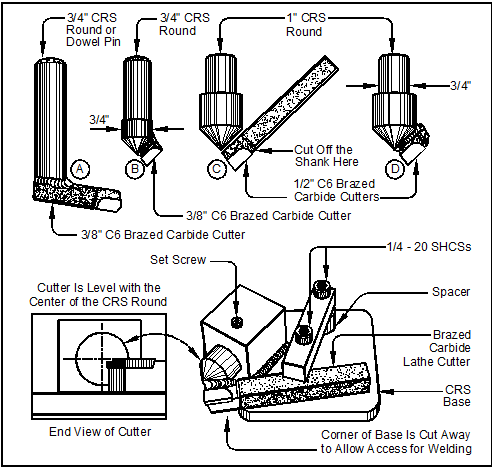
Figure 15-4. Single-lip carbide milling cutters and the welding fixture to make them.
Brass- or Bronze-Jawed Padded Pliers
There are two methods for making the padded-jaw pliers in Figure 15-5. Method 1 uses a brass insert brazed to the jaws and Method 2 uses silicon bronze TIG weld filler metal applied to line the inside of the jaws. But, before beginning either approach, the jaws of the pliers need to be ground down to make room for the new jaw material. This step must be done or the pliers will not close properly. At the bottom of Figure 15-5 notice that the edges of the new added jaw metal are slightly rounded so that when the pliers are used to bend materials such as piano wire, high stresses at the bend point are not induced. High stress at a single point can lead to cracking and failure, while a long, gradual bend will not cause stress failures. Padded-jaw pliers can also be used to straighten threaded rods without damaging them.
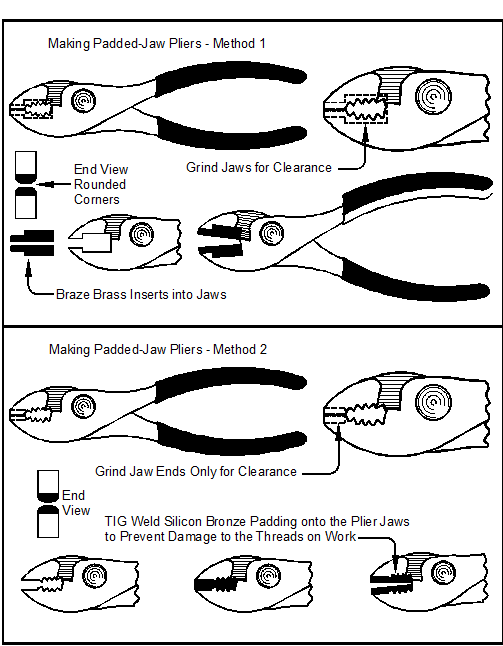
Figure 15-5. Two methods to make padded soft-jaw pliers.
Modifying Vise-Grip-Style Pliers
Vise-Grip-style pliers can be modified to handle long reaches as shown in Figure 15-6. The TIG welded-on adapters can be simple jaw extensions or pairs of telescoping tubes that can reach inside a part to hold it in place while welding.
In the bottom of Figure 15-6, two dowel pins, which touch each other at a right angle, provide smooth, low-friction surfaces for the pliers to pull up on the inside tubing.
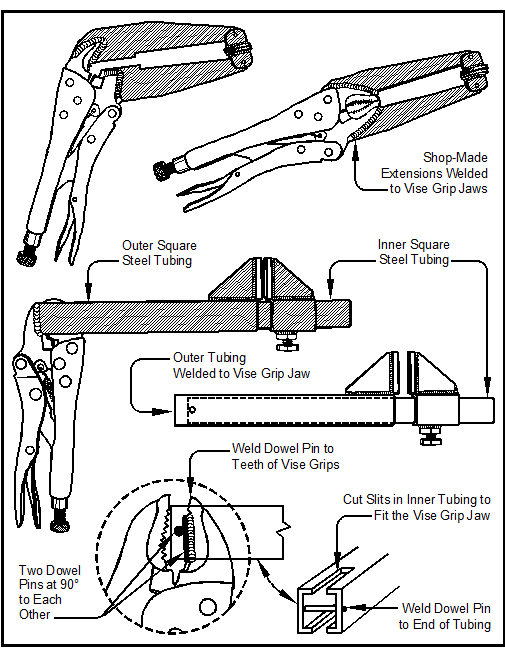
Figure 15-6. Modifications to Vise-Grip-style pliers added by TIG welding.